Making a Copy of a Hernandez y Aguado Guitar: How a Guitar is Assembled
This is a very exciting moment. With the gluing of the Sound-board your guitar really begins to take shape; it resonates when you tap it, and you can almost hear the sonorous tones it will produce once the strings are on.
Stanley Doubtfire, Make Your Own Classical Guitar, 1981
I am in the process of pore filling this guitar today, so I thought that many of you would like to see how the sound box of a guitar is assembled. I have left out some steps, what follows are the basic steps...

Gluing on two upper harmonic bars, I add one more bar underneath the fret board. These are glued on with Lee Valley's fish glue.

The ledge for the sound board is cut into the heel block of the neck. I did this step with a router on several earlier guitars with almost disastrous results, I cut this by hand these days.

Aligning the center line of the top with the center line of the neck.

Gluing and nailing the top to the heel block. Antonio Torres did the same thing! I pre-drill the holes for these nails these days, less error in placement and the nails hammer in as slick as a willow whistle!

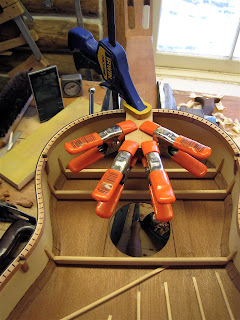
Clamping the top and heel block. In this photo you can see the third harmonic bar and the 1.5mm thick re-inforcment that is underneath the fret board. This reduces the chance of the top cracking with the movement of the ebony fret board.

Gluing the laminated sides to the top.

The sides are attached to the top with these little blocks, they are made from the same redwood as the top is, individually installed as I cut them from the kerfing stick. Yeah, I am a little bit of a geek.

A shop made miter box that I threw together from some scrap walnut.

The best glue on earth, fresh made hot hide glue! Each block was glued in place with this glue, it grabs quickly and is strong!

I use continuous kerfing for the back. I like to glue this on with fish glue.

Installing the pillarets for the harmonic bars.
Adding a wedge shape piece of wood to the heel of the the neck. The heel of the neck needs to contact the back for strength, the back is arched and this wedge is made so the heel is in the same arch as the back.

The back braces are shaped and the back is ready to be glued onto the guitar.

I use a rope cut from a tire inner tube to "clamp" the back to the sides. Again, I use fish glue, I really do like the stuff!
If you would like to know more about making a guitar, I highly recommend Guitarmaking: Tradition and Technology: A Complete Reference for the Design & Construction of the Steel-String Folk Guitar & the Classical Guitar, by Cumpiano and Natelson; and Making Master Guitars by Roy Courtnall.
Enjoy this YouTube of Tatyana Ryzhkova!
Stanley Doubtfire, Make Your Own Classical Guitar, 1981
I am in the process of pore filling this guitar today, so I thought that many of you would like to see how the sound box of a guitar is assembled. I have left out some steps, what follows are the basic steps...

Gluing on two upper harmonic bars, I add one more bar underneath the fret board. These are glued on with Lee Valley's fish glue.

The ledge for the sound board is cut into the heel block of the neck. I did this step with a router on several earlier guitars with almost disastrous results, I cut this by hand these days.

Aligning the center line of the top with the center line of the neck.

Gluing and nailing the top to the heel block. Antonio Torres did the same thing! I pre-drill the holes for these nails these days, less error in placement and the nails hammer in as slick as a willow whistle!

Clamping the top and heel block. In this photo you can see the third harmonic bar and the 1.5mm thick re-inforcment that is underneath the fret board. This reduces the chance of the top cracking with the movement of the ebony fret board.

Gluing the laminated sides to the top.

The sides are attached to the top with these little blocks, they are made from the same redwood as the top is, individually installed as I cut them from the kerfing stick. Yeah, I am a little bit of a geek.

A shop made miter box that I threw together from some scrap walnut.

The best glue on earth, fresh made hot hide glue! Each block was glued in place with this glue, it grabs quickly and is strong!

I use continuous kerfing for the back. I like to glue this on with fish glue.

Installing the pillarets for the harmonic bars.

Adding a wedge shape piece of wood to the heel of the the neck. The heel of the neck needs to contact the back for strength, the back is arched and this wedge is made so the heel is in the same arch as the back.

The back braces are shaped and the back is ready to be glued onto the guitar.

I use a rope cut from a tire inner tube to "clamp" the back to the sides. Again, I use fish glue, I really do like the stuff!
If you would like to know more about making a guitar, I highly recommend Guitarmaking: Tradition and Technology: A Complete Reference for the Design & Construction of the Steel-String Folk Guitar & the Classical Guitar, by Cumpiano and Natelson; and Making Master Guitars by Roy Courtnall.
Enjoy this YouTube of Tatyana Ryzhkova!


Comments
Post a Comment