Sunday, November 26, 2017

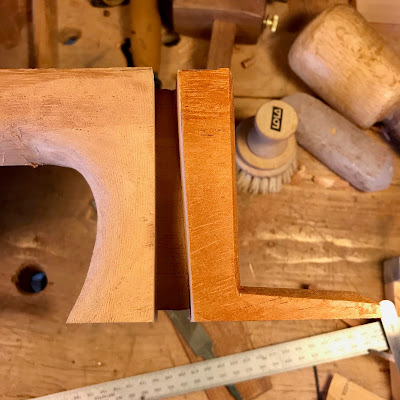
The Impractical Guitar Maker - Wedged Joints

Examination of the interior revealed the junction block used to connect the neck and body. The sides are slotted into the end block and held in place by wedges.

From A Detailed Description of an Early 17th Century Italian Five-Course Guitar

Tom and Mary Anne Evans, Guitars - From Renaissance to Rock, 1977

In making the body and neck of a classical guitar, the most complicated joint used is a scarf joint. The scarf joint is used to connect the headstock to the neck shaft, some makers use a more complicated "V" joint to connect the headstock to the shaft. Miter and butt joints are used on the bindings, but this is purely for decoration, bindings are used to cover simple joints. The guitar sides usually fit into slots cut into the heel block, I like to cut a wider, angled slot and use wedges to hold the sides in the heel block.

Anyone who has made a classical guitar with the help of the book, Making Master Guitars, by Roy Courtnall, should recognize this wedged joint. In Making Master Guitars the joint is touted by the master guitar maker, Jose Romanillos, he used this joint and a variation of it until he retired from making guitars.

I began using this joint early on in my journey in guitar making, it made sense. It is a strong joint and unlike cutting a narrow slot, it allows me some wiggle room in fixing how the side fits against the heel and the wedge against the side.


The wider slot allows me to clean up the saw cut that will be seen once the side is attached with a sanding stick, there is no need to see a gap between the side and the heel!


Once the wedge is cut, I put it in the slot with a "dummy"piece of wood that is the same thickness as the side. I then start to cut a kerf where the wedge and the heel block meet...


and continue to "saw kerf joint" the surfaces until...


I have a nice looking joint!

When the side is ready to be attached to the guitar top, all I need to do is to trim the wedge a little short so when I hammer it in the endow the wedge will be just shy of seating against the top. There is no need to glue the wedge in, it is a strong joint and the wedge won't go anywhere. If the wedge is glued then the joint is not reversible, a consideration if the guitar needs to be repaired!


Wednesday, November 22, 2017

Capos/Cejillas - New Batch of Six Padauk Wood Capos!


Stocking Stuffers for Your Favorite Classical Guitarist!

This week has been dedicated to making 1970's retro style cejillas, or capos, for classical and flamenco guitars.

What makes them retro?

Traditional cejillas used leather straps to protect the guitar's neck from the string that goes around the next and is attached to the peg that tightens the string. In the 1960's and 1970's several capo makers in Spain put vinyl tubing over the string for protection. I think the vinyl tubing was used partly for economic reasons:  it is cheaper than leather and it makes assembling a capo go much faster, plus some of the capos being sold were made from Galalith, a material made from casein and formaldehyde, it looked like plastic and was used to make jewelry. The vinyl tubing went well with the look of the Galalith.

I use vinyl tubing because it allows me to assemble a capo much faster than using a leather strap.

I want to make affordable capos, every classical /flamenco guitarist deserves a wooden capo!


The bodies are padauk with East Indian rosewood pegs; neoprene face; vinyl tubing and the string is a LaBella brand 3rd guitar string. String colors are either black, gold or red.


These are my current capo shapes.

A is a very traditional shape, this shape dates to the late 1600's, early 1700's.

B and C are my interpretation of two shapes used by several traditional Spanish capo makers.

$30 for each capo, shipping and handling are extra.

Due to CITES (Council on International Trade of Endangered Species) regulations, I am unable to ship these capos outside of the United States because of the East Indian rosewood pegs. I don't make enough money off of these to warrant getting re-export certificates for each capo. I can make these capos with boxwood pegs.


Monday, November 20, 2017

Using My Jack Planes As Smoothing Planes

The earliest known plane was a flat-bottomed tool for smoothing wood and nothing more.

Aldren A. Watson, Hand Tools, Their Ways and Workings, 1982


The only plane I owned when I started working with wood was a Stanley No.5, Type 4 plane. It wasn't tuned properly, the tote was a replacement my grandfather had made from a walnut board that never did fit the plane quite right, and because it was a Type 4 the depth adjuster knob turned the opposite direction from the later Stanley. It had most of its japanning and the sides had a wonderful patina on them that I later discovered was really rust. The iron was not original to the plane, the original iron mostly likely got worn down to nothing or was stolen from the plane while it was at a job site. I have no idea when my grandfather acquired this plane, perhaps he got it through a trade or barter for some carpentry job he did in the early part of the 20th century. I know he didn't buy it brand new, if I remember correctly, Type 4 Stanley planes were manufactured between 1874-88, my grandfather was born in 1881!

It was my smoothing plane, jointer plane and when pressed into service it was a really big block plane. I remember at the time I read in some woodworking book that No.5's were called "jack" planes because, as the author stated, you could use them for just about anything - dimensioning stock, smoothing stock and jointing edges, it was a "the jack of all trades" kind of plane. It was all that I needed, I didn't have much money back then, new tools were a luxury, I got by with what I had.

As time went on and I gained more experience in wood working,  I purchased several Stanley No.4 smoothing planes because books and magazines stated those were "the planes" a woodworker should own and use.  I spent quite a bit of time and effort to "tune" those planes, again, according to the information found woodworking books and magazines. Which each new plane I flatten the sole, I sharpened the edge of the chip breaker so it mated perfectly with the back of the iron, the iron was regulation shaped and sharpened and you know what? I never could get those planes to work the way I wanted them to. The iron would chatter or dig in at the wrong place, there was always something about those planes that fought me at every turn.

Whenever frustration would set in with a No.4 plane I turned to my faithful No.5. If I kept the iron of the No.5 sharp the plane always worked when I needed it to. Maybe it worked well for me because of the longer length or that it was the first plane I learned to use. The only other size plane that works well for me as a smoothing plane is a No.3 plane, we all know a No.3 is a smoothing plane.

Today, I use the No.5 to thin down classical guitar tops, backs and sides, I need to be fairly precise when doing this activity. Tops and backs need to be within the 1.8mm-2.3mm range, sides a little less than 2mm, I find that the the added weigh of the plane helps it go through the wood better, thus easier for me to control;  the extra length takes care of the high spots on the wood better than a regular smoothing plane and it is much lighter and more wildly than a No.7. I have never set up a No.5 plane to be a scrub plane, I have a No.40 Stanley scrub plane for that, one of the No.5's has an iron set up for smoothing, the other No.5 has a toothing plane which is used to help dimension guitar parts.

I sold the No.4 smoothing planes and an extra No.7 jointer plane last year in an effort to downsize my tool collection. I don't miss the No.4's and I tend not to recommend them to people just getting into woodworking, I suggest it may be better for them to start with a No.3 smoothing plane and I tell them that Alan Peters thought a No.7 was the best one to use.

Once you have decided what your focus is in woodworking, be it making Federal style furniture, Welsh stick chairs or classical guitars, you will discover what tools work best for you and when you do, stick with them!

Sunday, November 5, 2017

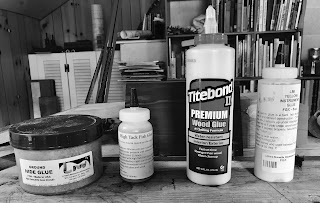
The Glues That I Use

While the most visible features of a fine quality guitar are the materials and craftsmanship used in conjunction, another factor that contributes to quality are the adhesives used to hold it all together.

Jose Oribe, The Fine Guitar, 1985

I want everyone to know that I am not receiving any money from any of the glue manufacturers that I will talk about in this post. These are the glues I use when I make a classical guitar or on other shop projects.


Here are my go-to glues.


Titebond and Titebond II are PVA glues that I use for glueing the scarf joint on a guitar neck and the heel block to the neck shaft. Titebond sets quickly, has gap filling properties and when I do my part on making a good joint, the glue line is almost invisible. Fish and hide glues tend to absorb the water present in shellac and can become dark making the glue line more pronounced.

I also use Titebond to glue the joints for the tops and backs for the same reason. I don't want the glue line to stand out.


I can't say enough good things about fish glue. I usually purchase fish glue from Lee Valley which is a high quality glue that I like very much, however, the smallest bottle is 16oz. in size and it takes me almost two years to use an entire bottle. I bought this small bottle from LMI and wow! this stuff will glue your fingers together!

I use this high tack glue to glue on binding strips and sometimes, if I am not in a hurry, I use it to glue the braces onto guitar backs.


This is the stuff!

Granular hide glue is simply amazing! It has a much and sometimes more shear strength that "modern" glues and dries glass hard, again, that is better fro energy transference.

I use hide glue where it really matters in guitar making - glueing the braces onto the top and back, the linings to the sides and glueing the back onto the guitar.

Every wood worker should try hide glue at least once on a project. Just make sure you have a heat gun handy to warm up all the parts that will be glue together.

Adhesives are what you make of them, each has their advantages and disadvantages, you need to experiment to find what works best for you and your projects.

Now, turn off your computer and get out into the shop!


1912 Ex-Segovia Cedar/East Indian Rosewood Classical Guitar

Inspired by AndrĂ©s Segovia’s famous 1912 Manuel Ramirez guitar, I chose Western red cedar top and East Indian rosewood back and sides from m...