Tuesday, May 26, 2015

French Polishing a Classical Guitar Bridge

Keep the pad small and flexible. Shape it to the work. Apply finish in small amounts to the outside of the pad. Use "spot finishing" technique, gliding, then applying pressure wherever you want the varnish to adhere.

Eugene Clark, Shellac and French Polishing, 1998


I know many people shy away from the art of French polishing, which I think is too bad.

Yes, there is a bit of a learning curve to it, but once you start to get the hang of the application technique you will find shellac to be very forgiving, e.g.,if you mess up one area, let it harden for about an hour and then fix it with some more shellac and alcohol.

And once you really start getting into French polishing you'll discover that you can build up a gloss finish in less than one half hour!


To apply shellac to this bridge I took a square piece of cloth, folded it in half and folded it once again.


Then I folded that again, note the triangle that is on top of my left index finger tip.


Here, I have transferred the cloth to my right hand, I am right handed after all, and I have placed two drops of alcohol, two drops of one pound cut shellac onto the corner of the cloth that sits on my index finger. I also added a very, very small smudge of olive oil to it, also.


I blot it on a piece of typing paper until the cloth is almost dry and then I start to French polish the bridge.

If there is the "ghost" trail where I can see the alcohol evaporate as I apply the mixture I know I am using the correct amount of liquids.


I am sure you are thinking at this point that by using only two drops of each that it would take forever to build up a surface.

Take a look at the photo above, I worked only fifteen minutes on this bridge. I know with two more sessions I will have filled in any pores that I missed with pumice and alcohol.

I am a big fan of French polishing and I believe other wood workers should give it a try! And don't believe all arguments against French polishing, it is easier than trying to make your first Krenov-style hand plane!

Ron Fernandez has a great DVD on how to French polishing a guitar, so does Robbie O'Brien, both DVDs are available here.

For more information on shellac go to Shellac.net and read this wonderful article (click here) on French polishing.

If you are interested in French polish and don't have someone to teach you how to do it, do some research on the internet and get at it!


Monday, May 25, 2015

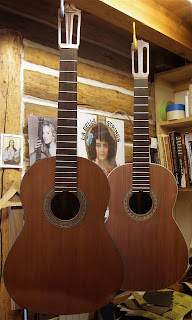
Hernandez y Aguado, Santos Hernandez and Antonio Torres Style Guitars

At the beginning of the twenty-first century, the classical guitar finds itself at a level of quality and popularity that was unimaginable even fifty years earlier.

David Tanenbaum, Perspectives on the Classical Guitar in the Twentieth Century, 2003


Happy Memorial Day! Please make today a time of remembrance!


I did spend some time in the shop today French polishing the Torres/Santos guitar that I need to deliver to its new owner soon, and I worked on a copy of the 1961 Hernandez y Aguado guitar.


The 1961 Hernandez y Aguado guitar, seen in the foreground in the above photo, needed shellac applied to its sides. A couple of more coats of shellac and I will be able to start French polishing the sides again. I say, again, because I ended up sanding down to the wood to make sure that all the pores really were filled and get rid of some piles of pumice. The finish work you do can never be good enough!

This Hy A copy has a redwood top, the top came from a redwood board that was salvaged from a barn on the border of Yosemite National Park, and it has Indian rosewood sides and back, the sides are laminated with Alaska yellow cedar. This is a "speculation" guitar, I really made it for myself, but I will offer it for sale once it is completed.

The guitar in the background is close copy of a 1930 Santos Hernandez guitar, click here to see the plans that I followed, that also has a redwood top and Indian rosewood back and sides, both sets purchased from LMI. This guitar I am making for a young man who is in the guitar program at Metro State University, Denver.


The guitar in the foreground is a close copy of the famous FE19 guitar made by the great guitar maker, Antonio Torres. It has a bearclaw Sitka spruce top with grandillo back and sides, this is the one I have am in need of finishing soon. If you follow my blog, you know who this guitar is being made for!

All three of this guitars will be exceptional in sound, loudness and playability.

Monday, May 18, 2015

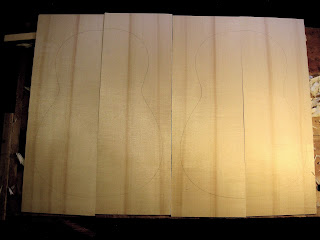
Colorado Engelmann Spruce Tonewood

The most dramatic tree of your first trip in the Rockies will almost be the Engelmann Spruce.

Donald Culross Peattie, A Natural History of Western Trees, 1953


Just arrived, two sets of Engelmann Spruce guitar tops!


I purchased these tops from Simeon Chambers out of Highlands Ranch, Colorado. I have heard good things about the tonewood his sells, so I decided to see that for myself.

Click here for his website and better yet, click here for his eBay store.


The order arrived within three days of placing it. Mr. Chambers did include four pieces of brace wood, enough I think for the transverse bars and fan bracing!

As you can see the wood is gorgeous, Mr. Chambers states that this wood is comes from trees that were killed in a forest fire back in the 1940's.

I want to pair one of these tops with curly hard maple back and sides...oh, so much work to do!


Another Way to Hold a Guitar Body with Two Holdfasts and a Box!

Without some way of holding the work, a workbench is hardly more than a table.

Scott Landis, The Workbench Book, 1987


A deadline is fast approaching and I have at least one more French polish session to do on the bearclaw Sitka spruce/granadillo guitar for Kyle Throw, an up and coming young classical guitarist in Denver, Colorado.

The trickiest part about French polishing a guitar is where the sides join the heel, you have to really smash down your polishing pad to get the shellac in the corner of the junction. And you can't work the area too much at a time or you will soften the shellac you just put down.

A bench mounted vise holds the guitar by the head stock or neck when I French polish, one problem with this is I have a limited view of that junction. Really, I can't the bench light just right to reflect off the shellac so I can see how much I am putting down.


Boards cut and ready to go!

I decided to remedy that problem today, I decided to make a guitar body holding box that can be mounted to the bench apron.

I got this idea from Scott Landis's The Workshop Book. Turn to page 31 of his book and you will see a photo of the workshop of Jeffery Elliot and Cyndy Burton. In the photo you see Jeff working on a guitar that is being held in a box.

Smart idea!

There was a handful of ponderosa/lodgepole pine boards in my other workshop, just right to make the box. No plans needed, I figured two inches wider and deeper than the guitar box. The rest I "eagle eyed".


Kyle's guitar swaddled in bubble wrap

A battery powered drill, some screws and the box quickly went together...


I marked the location for the holdfast holes and drilled them with my trust Stanley brace and Irwin drill bit...


and the hold fasts, well, um, hold the box tightly to the bench apron.


In this above photo, the redwood/Indian rosewood copy of a 1961 Hernandez y Aguado guitar sits well in the box ready for more alcohol/pumice pore filling.

The beauty of holding the guitar in such a box is the quick access to the sides on either side of the heel joint. It means a better job of French polishing!

Now, get out to your workshop and make something!

Friday, May 15, 2015

Making a Copy of a Miguel Rodriguez Guitar - Closing Up The Box

Every maker has his own little secret twist, only truly appreciated by the public and the aficionados.

Miguel Rodriguez, Jr. (1921-1998), master luthier, Cordoba, Spain


Ten years ago, an older friend found out that I was making classical guitars.

He invited me over to his little handmade house of reclaimed wood, it sat beneath gigantic sugar pines and incense cedars, and Lassen Volcanic National Park was only 50 feet from his back door. He said he had some wood I might be interested in, an invitation I couldn't turn down.

Beneath those sugar pines and cedars were about 100 bundles of hand split western red cedar shingles, all leftover from when he roofed his house fifteen years earlier.

He said, "Go wild and pick out what you want".

I did and now when I look back at that day, I wish I had taken more.

We all know what wishing gets us.

The guitar in the above photo is the first guitar that I have made from a pair of those cedar shakes.


The three piece back is some "wild grown" Indian rosewood with a sapele insert.

The braces are Spanish cedar, so are the back joint reinforcement strips.


I use Lee Valley Fish Glue to glue on the back and as you can see I rope the back onto the sides with a two inch wide strip cut from a tire inner tube.


The guitar is ready for the bindings, which will be sapele to match the back insert.

The rosette is very similar to the rosettes created by Francisco Simplicio and Ignacio Fleta.


I will work on this guitar as I can over the summer and fall, there are three other guitars for me to finish this summer.

If anyone would like color photos of this guitar, please contact me and I will send them to you!


Here's a YouTube of Raphaella Smits playing one of my favorite J.S. Bach pieces!

1912 Ex-Segovia Cedar/East Indian Rosewood Classical Guitar

Inspired by AndrĂ©s Segovia’s famous 1912 Manuel Ramirez guitar, I chose Western red cedar top and East Indian rosewood back and sides from m...