What I can never doubt, or help admitting, is that the guitars constructed by Antonio Torres are the achievement of the highest degree of guitar lutherie.
Manual Rodriguez, The Art and Craft of Making Classical Guitars, 2003
I have a soft spot for small guitars, the first two guitars I made were based upon an 1816 Jose Martinez guitar which isn't much bigger than a baritone ukulele. Though small, these guitars have a loud, lyrical voice and are quite fun to play.
Two guitars made by Antonio Torres, his SE117 and SE151a have always intrigued me - they were both made with the same plantilla, or shape, both have bodies that are 17 inches long. SE117 has a 604mm, (23.750") string length and SE151a has a 610mm (24") string length. Compare that to the 1816 Martinez guitar which has a 616mm (24.25") string length and its body is just over 16 inches long!
The Martinez is a great sounding little guitar, I figure that with a larger body the Torres style guitars should be even louder. I will find out if that is true.
The reason to make a guitar based upon the Torres SE117 guitar, plans for which are available here and here, is that I purchased a piece of gorgeous curly Oregon walnut from Lewis Judy at Northwest Timbers.
I had originally bought the piece to cut up into bindings, but the wood was so pretty I had to make something else out of it.
One thing that I have learned about guitar making is to make a full size drawing of the instrument before I start. I already had the template for this guitar made, I got it from Jose Romanillos's book, Antonio Torres: Guitar Maker - His Life & Work, I used that to make these drawings.
By drawing out this little guitar I discovered that in order to get the proper string height above the fret board I will have to dome the top as much as a full size guitar, nearly three millimeters, or one-eighth of an inch.
This is good to know.
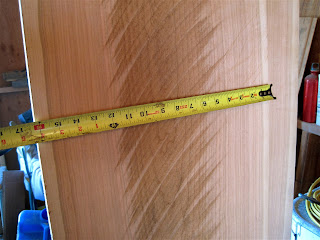
The curly walnut board was only five and one-half inches wide, too narrow for a standard two piece back, the drawing also helped me to figure out how wide of a filler piece I needed to make the back the required width.
I made the filler piece tapered on a 1 degree slant, copying what Torres did on his guitars where he used a third piece for the back.
Here are the three pieces of walnut with the two strips of curly maple for contrast. You can see the nice curl in the wood.
The three pieces being glued together.
I set a deadline for myself, I have until tomorrow afternoon to finish preparing all the parts for this guitar - sides, back, neck, top and bracing - if I am not finished then all parts go onto the shelf.
On Monday, I need to start assembling one of my Conservatory guitar models so I can have a less expensive guitar on hand to sell.
Saturday, November 28, 2015
Thursday, November 19, 2015
Wide Cherry Boards
Black-or wild-cherry trees do not like competition for sunlight from other trees.
Roy Underhill, The Woodwright's Shop, 1981
This morning I took a trip to a local Home Depot to see if I could find some nice Douglas fir to use in the rehabilitation of my old workbench. (More on that in other post!) I found only four boards that were really usable, I wanted more so I thought I would head over to Lowe's to check out their inventory.
On the way to Lowe's, I stopped at a local flea market to see what hard wood they had on hand, all I wanted to find was some nearly quarter sawn cherry for a guitar neck or two.
I walked back to the stacks of walnut, cherry and oak and when I saw what was there I knew I'd never get to Lowe's...
...this is what I found!
I have never run across cherry boards this wide here in Colorado.
The first one was fifteen inches wide, the second one, in the above photo, was sixteen inches...
...the third one was 18 inches wide! Another was at the very back of the stack that was 10 feet long! Now I wish I had taken the time to move the thirty or so boards that were in front of that one.
The gentleman who helped carry the boards to my trailer told me that he was a retired furniture maker and that I was very fortunate to find such wide boards at a great price. Each board was under sixty dollars.
When I spoke of my regret for not getting all the wide boards, he smiled and said,
"Come back in a couple of weeks, there will be more."
Yep, I'll go back!
Wednesday, November 18, 2015
What I've Learned About Woodworking - Hand Tools and Machines
Modern technology, with its vast capacity to produce cheaply everything needed by a burgeoning world population, has replaced the hand tools and the hand craftsmen which have attended mankind since its earliest days.
Alex W. Bealer, Old Ways of Working Wood, 1980
Perhaps I could cut out the back of the bubinga/ebony guitar faster with a bandsaw, but the coping saw makes me be aware of the wood and when I am done with this task the coping saw will hang on a peg.
A bandsaw makes noise, requires more space and electricity. I get to burn a few calories using a coping saw.
Now, if I were making doors and sashes for a living I would have shop full of power woodworking machines, I see their value in speed and efficiency for that kind of wood working.
I don't make doors and sashes for a living, I make guitars in a small shop.
Hand tools best suit my work...
...because they allow me to be intimate with the wood.
A guitar is a very intimate instrument, especially for the player.
Yes, I know that these days the sound of a guitar must be able to bounce off the back walls of a 3,000 seat concert venue, that is because the majority of people are use to loud noises and have lost the ability to listen well. I wonder, is that inability to listen well due to the noise of modern technology?
For me, woodworking is about taking my time to understand the tools and how they work with the wood...
...which means I learn how to work with the wood.
Tuesday, November 17, 2015
Another Use for Cam Clamps
There is quite a variety of clamps to meet the needs of the various kinds of work to be clamped.
Harry F. Ulrey, Audel's Carpenters and Builders Library No.1, 1965
There are days when I dislike using my Shop Fox vise to hold thin pieces of wood and today I needed to taper down a piece of ebony that is going to be inserted into a bubinga guitar back.
I used a technique that I figured out a while ago to hold the wood, a cam clamp front and back on the piece.
The clamp in the front gets butted up against the bench stop and the clamp on the back helps steady the piece while I plane away with my no.7 jointer plane.
This is what the back will look like, I still need to joint all edges before I proceed with the glueing process.
Yes, I do use exotic woods, but Auburn Hardwoods, where I got the bubinga and Luthiers Mercantile International, the ebony, both assured me that both woods were from sustainable sources.
Now, turn off the computer, get into your shop and do some work! I'm going for a run!
Monday, November 16, 2015
A Monumental Tree
You have heard people say, "He cannot see the woods for the trees." Meaning, that he cannot grasp the meaning of the big thing because a part of the thing holds all of his attention. This could apply to the average man's understanding of the importance of forests. The average man does not see the forests except as so many trees.
Ned H. Dearborn, Once in a Lifetime: A Guide to the CCC Camp, 1935
I enjoy collecting photos of a photographer who worked out of Susanville, California in the early decades of the last century. I am always looking for postcards of the logging scenes that he captured with his camera, especially those that he took near where I was born and raised in Northern California.
I recently acquired this postcard, it's a great shot of two loggers preparing to fall a huge ponderosa pine.
The logger on the left has a Puget Sound style double bit axe, the logger on the right has a "misery whip", a two man crosscut saw over his shoulder and is holding an axe in his right hand.
If you look at the base of the tree you can see a sledge hammer with wooden falling wedges. The one thing I don't see is a bottle of "coal oil", kerosene, a lubricant for the saw.
The photo was copyrighted by the Red River Lumber Company, which owned a huge sawmill and plywood plant in Westwood, California. Click here to see more photos of the Westwood mill.
This is a photo from my family's collection, it was probably taken by Bob Stinson, a photographer from Red Bluff, California, who traveled to the local logging camps and took photos of the loggers and logging operations just after the turn of the last century.
These three gents are making a face cut on what appears to be a sugar pine that has a rotted out heart, if you look real hard you can see a void in the tree just behind the crosscut saw.
The man on the far right is in a photo that Stinson took of the logging crew at Ed Byrant's camp, which was near Lyonsville, California, I assume this tree isn't too far from where that camp was.
This sugar pine wouldn't have been considered a big tree in that area...
...since loggers were bringing out monsters such as the sugar pine in 1890...
...or this one in 1905, again, near Lyonsville, California.
Why do I bring up these big trees?
There aren't many left.
This tree was "discovered" near Hayfork, California in 2008, it is 240 feet tall with a diameter of 8 feet! Click here to read the article about how this tree was found.
The world's tallest ponderosa pine, not the tree on the right of the photo, but the one to the left that the rope is attached to, at 268 feet tall, was located in 2011. Click here to read that article.
Thank goodness there are national and state parks that have preserved other large conifers!
I did some more research online and found several on-going studies that identify and age old trees.
It makes me think more about this thing called sustainability.
I wonder how many other woodworkers are concerned about having great lumber to work with in the future.
I know I will be looking for wood from sustainable sources to build my guitars, I need to practice what I preach.
What about you?
Sunday, November 8, 2015
When the Wood Tells You What to Make
I always think of wood as being alive.
James Krenov, A Cabinetmaker's Notebook, 1976
I ordered one piece of West African Ebony from Luthiers Mercantile International to cover the headstock on a Spanish cedar guitar neck, it was going to be a great contrast for the bubinga back and sides.
The headstock veneer fell to the floor and cracked, not a large crack and I was able to glue and clamp it together. When I was getting ready to dry fit the piece onto the headstock the ebony split full length when I was drilling a hole for one of the registering pins.
I guess this piece of ebony didn't want to cover the entire headstock.
I took one step back from the bench and recalled some advice that my father said to me when I young...
Sometimes the wood tells you what you should do.
The back of this guitar is going to have a tapered fillet of ebony down the middle, it seemed best to me to match that with a mirror image in the headstock veneer. This photo shows a piece of West African ebony between two jointed pieces of bubinga. Notice that I use a cabinet maker's triangle on the pieces.
I really enjoy using this old technique of string and wedges to glue wood together!
All parts lined up with no gaps.
The headstock after I drilled holes for the tuning machines and cut the slots for the tuning machine rollers.
I have yet to decide on what crest design I should use, this photo shows one design I like which is a blending of designs used by Domingo Esteso and Santos Hernandez.
I'm not sure the double ogee is the best way to show off the end of the ebony strip.
Here are some sketches that I made yesterday, the one with the asterisk by it is the crest design that my wife liked the best and I have to agree with her.
Now to practice making this new crest a couple of times on some pieces of pine to make sure I get it right before I work on the real thing.
Sunday, November 1, 2015
Classical Guitar Necks: Black Cherry and Spanish Cedar
I believe in tradition as long as it doesn't interfere with some of my ideas. First, I differ in the kind of wood that I use to make my guitar necks.
Arthur E. Overholtzer, Classic Guitar Making, 1974
I was busy last week.
First, I joined a western red cedar top, inlayed the rosette and then thinned the top down to about 2mm thick.
I want to experiment with the so-called fan/lattice bracing that is very popular right now amongst classic guitar makers.
The idea is to have a very, very thin top that is reinforced with an ultra strong, ultra light style of bracing, the concept is similar how the drum head on a banjo works.
These days young classical guitarists who compete in guitar competitions are playing the loudest guitars they can get their hands on. Some folks call these guitars "uber guitars", others call them "Australian guitars". These guitars are very loud and some don't sound like a guitar at all, they are very controversial right now in the classical guitar world.
Click here to how one luthier makes this style of guitar.
More on my cedar lattice braced guitar in upcoming posts.
Left, cherry neck. Right, Spanish cedar neck
Second, I started making two necks: one is of Spanish cedar which is for the lattice braced guitar; the other is of cherry, which is for a Conservatory model guitar that will be made of North American woods.
The cherry neck was a little too narrow, to make sure I have enough wood to make the head stock I added an "ear" to each side. Most of the excess wood will be cut off when I make the head stock and won't be noticeable when completed.
The heel block has been slotted to receive the guitar sides which will be held in place by wooden wedges, take a look at the photo on the top of this post to see the angles that I used.
I use a traditional "Spanish heel" on my guitars.
The saw in this photo is a Disston, it started out as a crosscut saw and now it is a rip saw!
An Atkins panel crosscut saw is just the thing to start the cut for the heel profile...
...which is completed with a shop made bow saw.
The necks awaiting the head stock veneers. The cedar neck will receive a Macassar ebony headplate and the cherry neck gets a walnut headplate made from cutoffs of the walnut back that goes with this neck.
Oh, so much work to do this week!
Subscribe to:
Posts (Atom)
1912 Ex-Segovia Cedar/East Indian Rosewood Classical Guitar
Inspired by Andrés Segovia’s famous 1912 Manuel Ramirez guitar, I chose Western red cedar top and East Indian rosewood back and sides from m...

-
I will cite the case of a marvelous concert player, a Japanese lady who is barely 5 ft. tall and with hands that are real miniatures. She pl...
-
What holds the Holy of the Holies, what did Brahma become? Wood. Why will aspen always tremble? For the nails driven into the cross. What ma...
-
Everything should be made as simple as possible, but not simpler. Albert Einstein, scientist, mathematician This morning I spent sever...