Posts

Showing posts from 2013

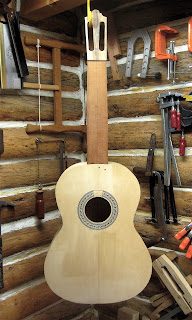
A Blonde Guitar - Making a Copy of the FE 19 Guitar by Antonio Torres: The Fretboard

Image
The left hand should always approach the fretboard in a position that allows each finger equal access to every string... Pepe Romero, La Guitarra: A Comprehensive Study of Classical Guitar Technique and Guide to Performing , 2012 Back at the workbench... Final shaping of the ebony fret board for "Amparo". I want the width at the nut to be 52mm and at the 12th fret 62mm, I don't know who established this relationship, but the fretboards on all the historic guitars, whose measured drawings that I have studied, are like that. After planing down this fretboard, I discovered that I need to flatten the sole of my No. 7 jointer! It's fine to use until I do, I just have to be very careful about setting the blade and using it. The fretboard held in place with some brass brads so I can mark the sound hole location. Then I carefully cut the half moon out with a coping saw, ebony is brittle wood and I don't want to chip it! This is Macassar ebony that I pur

The Best Wood

Image
In North America, the pine family is represented by 64 species of pines, spruces, firs, hemlocks, larches and Douglas-firs. Thirty-two of those species are found growing wild somewhere in California... Ronald M. Lanner, Conifers of California , 1999 I regard both the Picea Abies and the Thuja Plicata as two beautiful sisters - one blonde and the other brunette; one European and the other American, although I confess that I have a soft spot for the brunette... Jose Ramirez III, Things About the Guitar , 1990 I lost a potential client because I make guitars with black walnut backs and sides. This person thought that walnut is good only for "student guitars". Once again, this shows you how effect marketing done by the big name luthiers and guitar manufacturers has succeeded in making players believe that only the most expensive exotic woods make the best guitars. I can buy a curly walnut back/side set from Allied Lutherie from $220 to $300, and that is paying

A Blonde Guitar - Making a Copy of the FE 19 Guitar by Antonio Torres: Routing the Binding Ledges

Image
No other instrument - struck, plucked, strummed, bowed, blown - is so strongly bound emotionally with a Spaniard as is the guitar. Gregory d'Alessio, Guitar Review #46 , 1979 I bought a new Bosch router and a very expensive binding routing jig from Luthier Tool just so I could make better, more even binding ledges/rabbets. I am use to using a Dremel to rout these rabbets, the Bosch is quite a bit bigger and heavier and the router attachment isn't the most comfortable thing to hold onto. The thing about this jig is that the lowest roller bearing must be in contact with the side at all times! I found this out the hard way! Thankfully I was able to rout out the mistake in successive passes. This task of routing was a very scary experience, my heart was in my throat the whole operation! The jig did work well, one turn of the adjustment knob moves the bit in to or out of the cut exactly 3/32nd's of an inch. Impressive. The downcut spiral router bit produced a smooth

A Blonde Guitar - Making a Copy of the FE 19 Guitar by Antonio Torres: Binding and Purfling

Image
With the final shape of the violin complete, Stradivari applied his last piece of artistry: the purfling. Toby Faber, Stradivari's Genius, 2004 "Amparo" , Engelmann spruce/California laurel, based on guitar FE 19 made by Antonio de Torres. Did I mention that this guitar is for sale? Ebony and Manzanita Thumb Plane, Ebony/Bubinga End Graft and Bindings Yesterday was spent thicknessing strips of bubinga with a hand made tool for such a task, bubinga is tough wood, I had to put my foot against the work bench to get enough power to pull the strips through! Today was spent preparing the ebony binding for this Torres copy. I thicknessed the ebony and then glued simple lines of bubinga to buffer the contrast of ebony on California laurel. Click here to read more about this tool The end graft applied. Tomorrow I will rout out the binding ledges and hope all goes well! I got a new binding jig from Luthier Tool Company for my new Bosch Pony router

Basic Hand Tool Kit for Making a Classical Guitar, Revised

Image
Ours is really a simple craft. James Krenov, The Impractical Cabinetmaker , 1979 So, you want to build a guitar. Please see my May 5, 2021 post, A Basic Hand Tool Kit for Making a Classical Guitar - Another Look , for my latest thoughts on a hand tool kit.  Since the original post, Basic Hand Tool Kit for Guitar Making , click here to see it, is the most popular post on this blog, I thought I would revisit it and adjust it to what I am using now to make a classical guitar. The first thing I recommend doing is to buy or borrow copies of the following books: Guitar Making: Tradition and Technology , by William Cumpiano and Jonathan Natelson Making Master Guitars , by Roy Courtnall The Guitar Maker's Workshop , by Rik Middleton These are required reading before you begin making a guitar. Also required reading are these books by Roy Underhill: The Woodwright's Shop The Woodwright's Companion The Woodwright's Workbench The Woodwright's Apprentice

A Blonde Guitar - Making a Copy of the FE 19 Guitar by Antonio Torres

Image
Many stories are still told about the lure that Torres' guitars had for enthusiasts who heard them being played. Jose Romanillos, Antonio de Torres, Guitar Maker-His Life & Work , 1987 I am out of practice. I've almost chained myself to the workbench to get this guitar done, just so I can remember what I forgot. How did I assemble the last guitar? How thick or thin should I make the hide glue to perform at its best? Is this how I clamp the sides down to the top? Now, how is it that I can bend wood? So many things. This isn't an exact copy of Torres' famous FE 19 guitar (FE stands for First Epoch, these are the guitars Torres made before he gave up guitar making and opened a store to sell china), as you can see I am using a parallel bracing on the top instead of the "Torres kite" or fan bracing. The crest on the head stock is not a Torres design; it is based on Daniel Friederich's crest; the top is Engelmann spruce and the top brac

A New Workbench, Part 1, or No More Tool Chests in My Studio!

Image
An early form of Woodworker's Bench used by the Romans consisted of a stout plank on four splayed leg s. R.A. Salaman, Dictionary of Woodworking Tools , 1975 I am a little tired of my tool chest. As soon as I close the lid things magically appear on top of it. I remove these items so I can rummage through the chest to find what I need. And the stuff reappears once the lid goes back down. I think the wood working elves are having fun with me. I work in a small studio, it's 10'x11' and is between our bedroom and kitchen. I have some storage with shelves, but I desperately need another work surface for finishing my guitars. I spent most of last week working on building the carcass (yes, I am using the American form of the word) for a new work bench. I sawed out the tenons by hand, I drilled all the mortises with a brace and bit. While doing all that I remembered why I never got into furniture making, I really don't enjoy making squares and rectangle

When Things Go Wrong-Fixing Holes in a Classical Guitar Headstock

Image
Measure twice, cut once, but make sure you cut on the correct line. Merle Burnham, my father, 1976 This is a neck for a copy of a 1929 Santos Hernandez guitar, it's all glued up from heel block to head stock. In this photo I am adjusted the sides of the neck with a draw knife so I can carefully plane the sides of the head stock perfectly square so the tuning machines can have some where to sit. What happened next is that I drilled all six holes in the head stock only to find out that I had laid out the positions for the holes using the wrong reference line. Whoops! Spanish cedar is getting scarce, I bought this blank from Stew-Mac just before they stopped selling Spanish cedar neck blanks. I didn't want to throw it into the wood stove, I owe it to the Universe to persevere and use this neck. With my trusty knife, block plane, Porter Cable 14 volt drill and a 13/32 inch hole drilled into a piece of bubinga, I made three dowels from a scrap piece of Spanish ceda

Making a Gramercy Bow Saw

Image
The Office of the Cheeks made to the Frame Saw is, by the twisted Cord and Tongue in the middle, to draw the upper ends of the Cheeks closer together, that the lower end of the Cheeks may be drawn the wider asunder, and strain the Blade of the Saw the straighter. Joseph Moxon, Mechanick Exercises , 1677 I made my first bow saw over twenty years ago using an idea from Roy Underhill and Drew Langsner. I still use that saw, I made the frame from some black oak (quercus kellogii) that I had harvested from my Paynes Creek, California property and the handles are mulberry that were turned on a spring pole lathe. The blade is made from a band saw blade. Like many wood workers, I have longed to have a sexy curvy bow saw just like those joiners of old, so last night and most of this morning I made a nice bow saw from some black walnut. It was over six months ago when I purchased handles, pins and blades from Tools For Working Wood and I had this crazy idea that I was going to con

Krenov Style Scaper Plane, Part 2

Image
Up to the middle of the seventeenth century at least, most joiner's planes were made by the craftsman himself. As they were largely confined to the ordinary bench planes and only one of each type would be required, this was a fairly simple matter. R.A. Salaman, Dictionary of Woodworking Tools , 1975 I made the wedge last night and then went at the plane body with a horseshoeing rasp (a leftover from a previous occupation) and a series of spokeshaves. The plane works on soft wood, but I need to round the corners of the blade and then turn a hook on the edge. The real test will be on Indian rosewood that I am using for one of my guitars. The only power tools that I used to make this plane were a table saw, used to rip the sides off the main body, and a sliding compound miter saw to cut the bed angles. I did use a drill press to drill the hole for the cross pin. I could have done that by hand with a brace and bit, which you can do if you do your layout properly. The other tool

New Guitar Tops-Hernandez y Aguado and Santos Hernandez

Image
I love order and clarity and balance. Andres Segovia Next week I finally get some time to start building two new guitars. The top on the left will become part of a close copy of a guitar constructed in 1968 by Manuel Hernandez y Victoriano Aguado. The top is redwood, I re-sawed it (by hand using a Disston rip saw) from a board that came from an old barn outside of Yosemite National Park and I was able to get only two good tops from that board. The original guitar had this asymmetrical bracing, this helps to center the fundamental mode (or tone) of the guitar on the bridge and will help make this guitar's sound carry to the back of a concert hall. Hernandez y Aguado are believed to have developed this style of bracing after seeing the inside of a guitar that was made by Jose Ramirez III in the early 1960's. I used this bracing on my guitar No. 5 with great success. This guitar will have Indian rosewood back and sides. The top on the right is Englemann spruce and will

Rocky Mountain Mammoth Mine, Boulder County, Colorado-Restoration Work on the Cabin is Complete!

Image
Shacks are brown, big where things were sold, wheat or girls, small where miners lived. Some fell while we were crawling up the hill. Standing shacks are pale. Old weeds believe in Spring. Richard Hugo, Ghosts at Garnet , The Lady in Kicking Horse Reservoir, 1973 Friday, November 8, 2013, I and my crew walked away from the cabin at the Rocky Mountain Mammoth mine. Everything is done, new roofing, foundation, siding, flooring, even half round gutters (which are not historically correct, I'm not the one who wanted them!). Drainage and landscaping is done and I am happy. I am also sad, it is a wonderful place to work and to visit. South elevation South elevation West elevation North elevation East elevation An aspen leave that was stuck to the siding. A beautiful parting gesture.

Re-Toothing a Disston Handsaw, or A Fool's Errand That Ended Well

Image
The most difficult part in sawing is starting the saw. Bernard E. Jones, The Practical Woodworker , 190? I'm starting to prepare for winter work, that means building a few guitars, by finishing up some projects I started a while back. One of those projects was to re-tooth one of two panel saws I own: an early 1900's 18 inch long Disston crosscut or 1920's-ish Warranted Superior saw that is 20 inches long. The Warranted Superior saw needs some time at the anvil for straightening, so I opted for the Disston. One reason for the conversion is that at the moment, I am not willing to shell out $250 for a Lie Nielsen rip tooth panel saw. I know such a saw is a bargain at that price, but I need a few more orders to justify the expense. The main reason for doing this work is the 26-28 inch Disston rip saws hanging by the window behind the work bench can be a little big for ripping smallish pieces of wood. First thing I needed to do was to turn a new handle for the fou