Here it is! My first video on YouTube of me playing the 1961 Robert Bouchet Sitka Spruce/Walnut guitar.
I shot this with my iPhone this afternoon, and after several takes I got what I was after.
Now, if I could only make time to practice on a regular basis, I might do this guitar justice.
It really is a fine guitar-good separation and evenness of notes, a wonderful singing voice - this is the kind of guitar that makes you want to practice on a daily basis.
This guitar received a wonderful reception from Alex Komodore, guitar professor at Metropolitan State University, Denver, Colorado; Warren Haskell, guitar educator and former director of the guitar program at California State University, Chico; and the members of the Boulder Guitar Society, Boulder, Colorado.
Here are some photographs of the guitar.
If you would like any information about this guitar, or others that you see in the side bar on the right side of my blog, please contact me at highcountrylutherie@gmail.com
Monday, April 21, 2014
Sunday, April 20, 2014
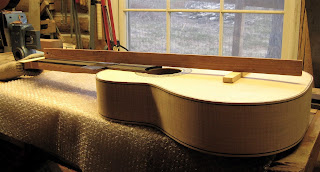
Seven String Classical Guitar: Checking the Neck Angle and Starting the French Polish
...the (guitar's) graceful lines and splendor of its body possessed my heart as swiftly as would the features of a heaven-sent woman suddenly appearing to become the loving companion of a lifetime.
Andres Segovia, Segovia, 1976
Binding installed, fret board glued and fretted
Much is written in guitar making books and journals about proper neck angle of a guitar, I won't delve into it here, because others have done a better job writing about it than I could.
I make my guitars in the style suggested by a 2004 Guild of American Luthiers lecture given by Eugene Clark. Part of that process is that I keep the neck and the heel block on the same plane, you draw a line along the neck in will intersect with the top at the heel block.
The top is domed in the area of the bridge. This doming adds the proper amount of "neck angle", so to speak.
In the above photo I have a 1mm thick piece of steel at the location of the first fret. 1mm represents the height of the string at that fret.
There is a 10mm thick piece of wood at the bridge location, which represents the string height at that location.
Right on the money!
I put a 2mm thick piece at the 12th fret, I am looking for 4mm clearance between that and the straight edge.
I got it and the only sanding that I needed to do on the fret board was to level it.
Pretty sweet.
Even one wash coat of shellac sure makes fiddle back maple "pop"!
Once the fret board was installed and fretted I started that wonderful task known as sanding. And sanding and sanding.
And filling in any gaps.
Then I can start laying down a wash coat of shellac.
This is some gorgeous wood...
When I first started learning how to French polish, I used a 2 pound cut of shellac. I had read that Cyndy Burton used a 2 pound so I figured I could too.
I have tried 1 1/2 pound cut and a 1 pound cut, but I have gone back to a 2 pound cut because of how quickly it builds up and for some reason it is easier for me to use.
Now that I am back at my "regular day job", I will have to make time to finish this beautiful guitar.
I don't remember when I bought the top, I think I bought it from Alaska Specialty Woods back in 2008 or 2009, it is Sitka spruce and has some wonderful characteristics to it, more show up as I put on the shellac.
I call this guitar, Novia, which is "sweetheart" in Spanish.
Enjoy the YouTube videos!
One of my favorite performers, Scott Tennant, plays one of my favorite Couperin keyboard works.
I added Rod MacKillop because I was asked recently by a client if I could make a baroque guitar.
I can, by the way.
Some of you may recognize the piece MacKillop is playing, Joaquin Rodrigo used this melody in Fantasia para un gentilhombre.
Saturday, April 5, 2014
Seven String Classical Guitar: Using a Veneer Scraper and Installing Curly Maple Bindings
I was oblivious to the classical guitar until age twenty three.
Jose Oribe, The Fine Guitar, 1985
Dial caliper, gramil, veneer and veneer cutting board
If there is one part of making a guitar that really can frustrate me it is making and installing the bindings.
Some of the tasks/problems involved are-
*bringing the bindings down to .05 of an inch thick without breaking anything
*thin pieces ebony break easily and have nasty little splinters
*routing a consistent channel without blowing out any piece of wood or letting the router bit/chisel wander
This task/act/duty is where any little mistake you make will show for the life of the guitar, unless you know how to fix that mistake.
The great Spanish luthier, Jose Ramirez II once said,
In all human work, the wise look for virtues and fools look for flaws.
Shop made veneer scraper
Two months ago, when I was working on the dimensional copy of Torres' FE 19, I discovered I was going to run out of maple veneer, but I figured I could get by with what I had on hand.
It was a poor quality veneer that I had purchased from LMI (I am sure LMI thought it was good enough!), grain runout was terrible, I would cut a 6mm wide strip and it would break into several pieces just lifting it off the work bench.
This past Friday I took a drive down the hill to Loveland, Colorado to The Wood Emporium, (sorry, Loren, the owner doesn't have a website) and thankfully Loren had some very nice maple veneer on hand. Where would we wood workers be without independent wood suppliers? Loren's shop is a much shorter trip than the Loveland Woodcraft Store and he remembers me.
A few passes through the veneer scraper put the veneer to where I wanted it, .018 of an inch thick. This is for the BWB purfling that will go on the guitar's top.
Binding rabbets after routing
I swore I wouldn't use a router on this guitar, but a router will make a consistent rabbet for depth and it doesn't take all day to do the work.
Once the router work is done I still have to go back and clean up the rabbet by hand using files, chisels, X-Acto knives, emory boards (the kind for doing your fingernails) and anything else that will do the work.
Many of the books on guitar building pretty much tell you that once you rout the channels with a router you are done, go ahead and pop the binding right in!
It's not that easy.
And as I said earlier, this is the time when you can make the mistake that will be seen forever.
No gaps is the goal, but it does happen. What do I do to remedy the problem?
I use hide glue and sawdust, CA glue and sawdust, lacquer stick, "pine, fir or larch resin, with red pigments" and a whole lot of prayer.
Curly maple binding with ebony purfling
One quarter of the binding is complete! Three more strips to install and then I can glue on the fret board! I could've glued on most of the binding today, but I didn't see the reason to, it is the weekend after all!
I just "discovered" this wonderful young guitarist (playing an eight string guitar) the other day while surfing the Internet, he is absolutely amazing! Very clear musical ideas with a wonderful technique and best of all, he does not suffer from the dreaded "guitar face"! No facial grimaces or contortions, a player worthy of the School of Andres Segovia! I'd pay money to see this kid!
Enjoy!
Subscribe to:
Posts (Atom)
1912 Ex-Segovia Cedar/East Indian Rosewood Classical Guitar
Inspired by AndrĂ©s Segovia’s famous 1912 Manuel Ramirez guitar, I chose Western red cedar top and East Indian rosewood back and sides from m...

-
I will cite the case of a marvelous concert player, a Japanese lady who is barely 5 ft. tall and with hands that are real miniatures. She pl...
-
What holds the Holy of the Holies, what did Brahma become? Wood. Why will aspen always tremble? For the nails driven into the cross. What ma...
-
Everything should be made as simple as possible, but not simpler. Albert Einstein, scientist, mathematician This morning I spent sever...