Making an Antonio Torres Style Guitar: Top Bracing, Attaching Top to Neck and Bending Sides by Hand
A truly great guitar needs the human touch, intuition, and insight; therefore, I still primarily use hand tools so that I may feel the wood as I work with it.
Dake Traphagen, Master Luthier
Last posting of 2014!
Thanks to all of you who have visited my blog and those who have left comments!
Thank You to Paul and Joseph Sellers (I hope I got that right!) for keeping Unplugged Shop going and posting my blog posts on it.
Thank You to Luke Townsley for starting Unplugged Shop.
Thank You Leif at Norse Woodsmith for his aggregator.
Here's a photo essay with captions of my process of creating a copy of Antonio Torres' FE 19 1864 "La Suprema" guitar. This guitar is for a young, up and coming classic guitarist in the Denver, Colorado area.
The body shape is a copy of FE 19 as drawn by Neil Ostberg, click here for his site, but the top bracing is based upon a guitar made by the great Santos Hernandez in the 1920's.
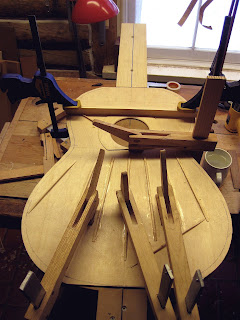
Braces are glued on with hot hide glue, the clamps are not clamping the braces, but holding the top to the shape of the scooped out work board. The hide glue dries in under four minutes, no need for clamps!
My glue pot.
Glueing on the transverse braces. Note the slanted, or angled, lower brace, this is some that Santos did on some of his guitars with the idea that this would tighten up the treble area of the top, to help the treble strings be as loud and even as the bass strings.
Glueing on the last transverse brace.
Granadillo sides, this wood is a bear to bend!
Electric bending iron and the sides in the background. I will touch up the sides before I attach them to the top.
My Stanley No. 271 router that I use to clean up the shelf on the heel where the top attaches...
Getting ready to apply the glue to the neck/heel union. The straight edge aligns the neck and top center line, I nail the top to the heel with three nails...
Waiting for the glue to harden...
In this photo I had just glued the end block on to the top. The next step is to attach the sides!
Happy New Year!


Comments
Post a Comment